QuickOPC User's Guide and Reference
OPC-DA Item Dialog
Features > User Interface > OPC Common Dialogs > OPC-DA Common Dialogs > OPC-DA Item Dialog
In This Topic

General

Icon:

The OPC-DA Item Dialog (DAItemDialog class) allows the user to interactively select the OPC item residing in a specific OPC server.

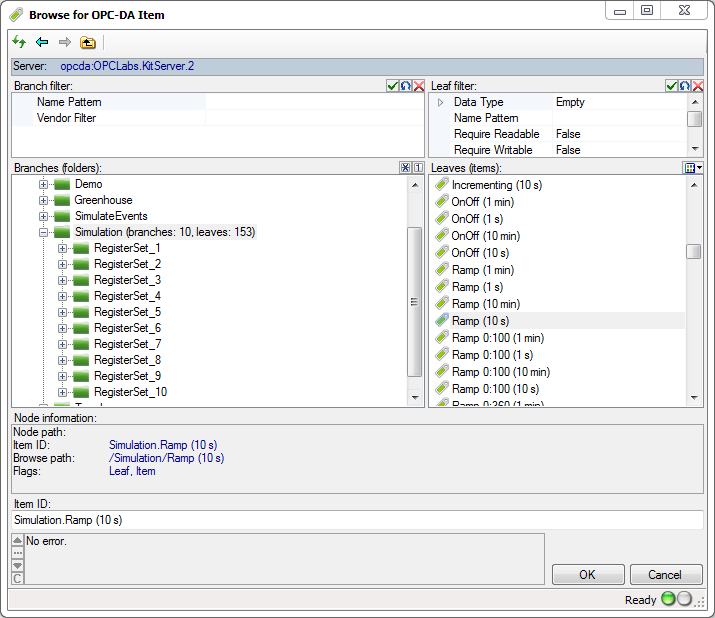
Use the ServerDescriptor property to specify the OPC Data Access server whose items are to be browsed, and call the ShowDialog method. If the result is equal to DialogResult.OK, the user has selected the OPC item, and information about it can be retrieved from the NodeElement property.

.NET

// This example shows how to let the user browse for an OPC Data Access item. 

using System.Windows.Forms;
using OpcLabs.EasyOpc.DataAccess.Forms.Browsing;

namespace FormsDocExamples._DAItemDialog
{
    static class ShowDialog
    {
        public static void Main1(IWin32Window owner)
        {
            var itemDialog = new DAItemDialog
            {
                ServerDescriptor = {ServerClass = "OPCLabs.KitServer.2"}
            };

            DialogResult dialogResult = itemDialog.ShowDialog(owner);
            if (dialogResult != DialogResult.OK)
                return;

            // Display results
            MessageBox.Show(owner, $"NodeElement: {itemDialog.NodeElement}");
        }
    }
}
# This example shows how to let the user browse for an OPC Data Access item. 

# The path below assumes that the current directory is [ProductDir]/Examples-NET/PowerShell/Windows .
Add-Type -Path "../../../Components/Opclabs.QuickOpc/net472/OpcLabs.EasyOpcForms.dll"

$itemDialog = New-Object OpcLabs.EasyOpc.DataAccess.Forms.Browsing.DAItemDialog
$itemDialog.ServerDescriptor.ServerClass = "OPCLabs.KitServer.2"

$dialogResult = $itemDialog.ShowDialog()
if ($dialogResult -ne [System.Windows.Forms.DialogResult]::OK) {
    return
}

# Display results
Write-Host "NodeElement: $($itemDialog.NodeElement)"
# This example shows how to let the user browse for an OPC Data Access item.

# The QuickOPC package is needed. Install it using "pip install opclabs_quickopc".
import opclabs_quickopc

# Import .NET namespaces.
from System.Windows.Forms import *
from OpcLabs.EasyOpc.DataAccess.Forms.Browsing import *


itemDialog = DAItemDialog()
itemDialog.ServerDescriptor.ServerClass = "OPCLabs.KitServer.2"

dialogResult = itemDialog.ShowDialog()
print(dialogResult)
if dialogResult != DialogResult.OK:
    exit()

# Display results.
print('NodeElement: ', itemDialog.NodeElement, sep='')

COM

// This example shows how to let the user browse for an OPC Data Access item.

class procedure ShowDialog.Main;
var
  ItemDialog: OpcLabs_EasyOpcForms_TLB._DAItemDialog;
begin
  // Instantiate the dialog object
  ItemDialog := CoDAItemDialog.Create;

  ItemDialog.ServerDescriptor.ServerClass := 'OPCLabs.KitServer.2';

  ItemDialog.ShowDialog(nil);

  // Display results
  WriteLn(ItemDialog.NodeElement.ToString);
end;
Rem This example shows how to let the user browse for an OPC Data Access item.

Private Sub ShowDialog_Main_Command_Click()
    OutputText = ""

    ' Instantiate the dialog object
    Dim itemDialog As New DAItemDialog
    Dim dialogResult
    dialogResult = itemDialog.ShowDialog
    
    itemDialog.serverDescriptor.ServerClass = "OPCLabs.KitServer.2"
    
    OutputText = OutputText & dialogResult & vbCrLf
    If dialogResult <> 1 Then   ' OK
        Exit Sub
    End If
    
    ' Display results
    OutputText = OutputText & itemDialog.NodeElement & vbCrLf
End Sub
Rem This example shows how to let the user browse for an OPC Data Access item. 

Option Explicit

Const DialogResult_OK = 1

Dim ItemDialog: Set ItemDialog = CreateObject("OpcLabs.EasyOpc.DataAccess.Forms.Browsing.DAItemDialog")
ItemDialog.ServerDescriptor.ServerClass = "OPCLabs.KitServer.2"
Dim dialogResult: dialogResult = ItemDialog.ShowDialog
WScript.Echo dialogResult

If dialogResult <> DialogResult_OK Then
    WScript.Quit
End If

' Display results
WScript.Echo "NodeElement: " & ItemDialog.NodeElement


The DAItemDialog component retains the filter setting for each node between the invocations of the dialog, making it faster for the user to navigate during the subsequent invocations.

Multi-selection

When you set the MultiSelect property of the DAItemDialog to true, the dialog will allow the user to select any number of OPC-DA items. In the multi-select mode, the dialog looks similar to this:

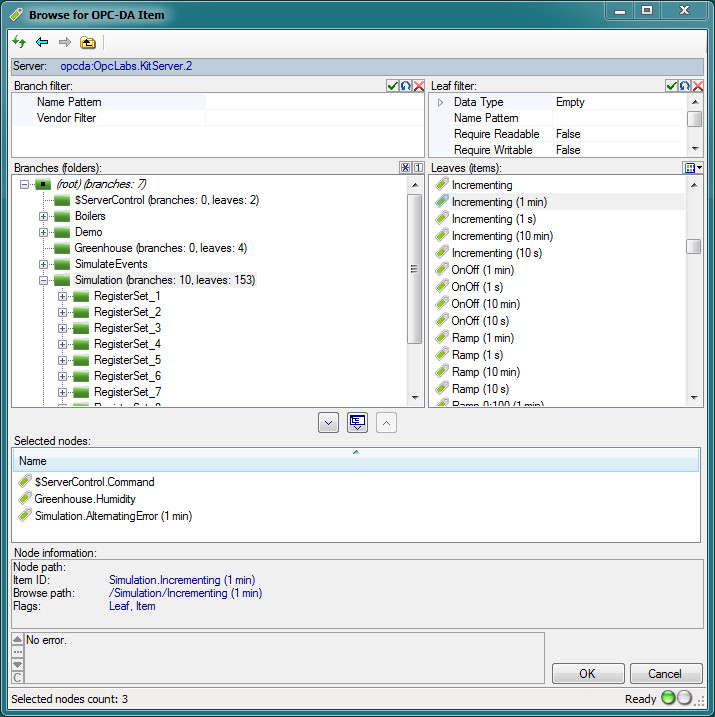
The list below the branches and leaves (labeled “Selected nodes”) contains the set of nodes that the user has selected in the dialog. The user can freely add nodes to this list, or remove them. The selected set is carried over to next invocation of the dialog, unless you change it from the code.

In the multi-selection mode, the set of nodes selected on input (if any) is in the NodeDescriptors property. On the output, the dialog fills the information about selected nodes into the NodeElements property (and updated the NodeDescriptors property as well).

Advanced

If you want to change the parameters of the client object the component uses to perform its OPC operations, you can use the ClientSelector Property.

See Also